How to Write a Hashcat Module
There’s not a lot written about creating new Hashcat modules. This is a brief tour of how I went about adding a new module and something I wish I had available a week ago. Hopefully after reading this you have a better understanding of how the pieces work and will enable you to more easily add new Hashcat modules.
For what it’s worth, this is written from the perspective of someone who care barely read C. And while I refer to OpenCL a few times, if your crypto primitives aren’t supported already, this article probably won’t help you.
389-DS Password Hashes
{PBKDF2_SHA256}AACkEGhlaiBqZW5z/jtuSox0CrtV9SHiVFjYeHpQ/ki2kwDrQeSqiiTn8LOmpPCw3r6TK/JDfl+ZAXRoc3VidGxldHllIXuxBDl6ItQOMupkRn+hzi/LEdr62a7B9sNOo8BPL9Z2nOi/m9AI+nAd/qwpLD1fbeDgs2DdpCZ4QfljuCLRBdURZV3HcXDUjD7PZ1CQcIOv9VbFlbu0IBmiU7ccMyb/qoxi+rPMqE4U8f6hL0TQjTjlOzU9MpPYS+WfztpYy7lEN6QghhOz0xe+0y2rDoK+yCS4PykkNS4FFc+xeiT6SNy3r7m+0teyaQKOExLrjogWkj+t+e4bMpHNx/FL3jkjCsuZnhq/t8eshG9DKmeD9b/QMkqT8dxe0jmr0s4+GnmHpMQMAxYW3pg70TluiDp3kJrDr1/d8OQerkQRevNx
I previously wrote about cracking Red Hat’s 389-DS hashes in PBKDF2_SHA256 format and was under the impression that cracking those hashes required the same Netscape Security Services libraries that 389-DS used behind the scenes to recreate the key material. After some additional testing, I realized they were simply using the standard “Password-Based Cryptography Specification” as defined in PKCS#5 RFC2898.
Since these PKCS5 libraries are supported in multiple languages including Perl, which is what Hashcat’s test modules use, the PBKDF2-HMAC-SHA256 primitives are already supported in Hashcat, and I wouldn’t need to write any OpenCL code, I dived into adding a new module.
If we look at the the implemention we see that it refers to PKCS5 and PKCS11 to get key data.
Since we know how to extract the necessary components from a password hash from prior work, we can easily plug the key material into a standard implementation of Python’s hashlib or Perl’s Crypt::PBKDF2 library. To briefly recap, the hash is composed of base64(ntohl(iterations)[4] + salt[64] + digest[256])
First we create a key and extract the values.
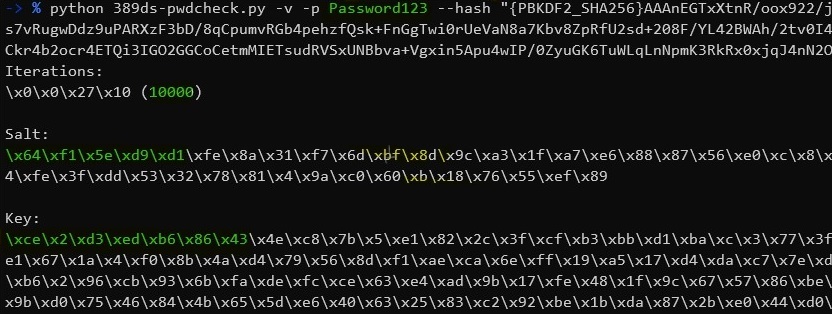
Then plug those values into python’s hashlib library. If the underlying implementation is the same we should see the same key value created.

And sure enough, the keys match, starting with \xcd\x02\xd3. So no more needing to use the NSS libraries as I initially thought.
Since Hashcat has OpenCL support for hashlib PBKDF2-HMAC-SHA256 it provides a good starting point to jump off from.
Getting Started
While not much is written about creating hashcat modules, there are a few resources. Dualuse has a write up about adding a new OpenCL kernel but it refers to Hashcat code that has since been refactored. And in this case we won’t be writing a kernel.
Andrew Ruddick wrote a great paper “…what is inside the black-box of oclHashcat” which provides a good intro to crypto primitives and OpenCL along with some good references at the end.
And Jens Steube, author of Hashcat, has some interesting slides covering how these algorithms can be optimized with impressive performance improvements. If you take away nothing else, “from the computer’s view, passwords are just numbers”.
Essentially, I just started by using similar modules as templates, looking through past pull requests, and copy pasting.
Building and Debugging
Building on linux
Developing on a native Linux machine is straightforward.
$ git clone https://github.com/hashcat/hashcat.git
$ make
If you’re running in a VM without native access to your GPU, you’ll also want to be able to tell hashcat to use the CPU so install these additional libraries.
sudo apt install libhwloc-dev ocl-icd-dev ocl-icd-opencl-dev
sudo apt install pocl-opencl-icd
And then use the --force flag in hashcat.
Also, if you’re building for Windows on WSL you may run into issues with iconv. The steps outlined at this issue worked for me:
sudo git clone https://github.com/win-iconv/win-iconv
sudo mv /opt/win-iconv/ /opt/win-iconv-64/
sudo patch /opt/win-iconv-64/Makefile -i ~/hashcat/tools/win-iconv-64.diff
sudo make
sudo mkdir /opt/win-iconv-64/lib
sudo cp /opt/win-iconv-64/lib* /opt/win-iconv-64/lib/
cd ~/hashcat
sudo make win
Debugging
I used VSCode and GDB for building and debugging which worked quite nicely. There are two VSCode Tasks that make this seamless.
First is to create a Build Task (Terminal > Configure Tasks) which runs hashcat’s Makefile:
{
    "tasks": [
        {
            "type": "shell",
            "label": "Build Debug",
            "command": "make -f ${workspaceFolder}/Makefile DEBUG=1",
            "group": {
                "kind": "build",
                "isDefault": true
            },
            "presentation": {
                "reveal": "always",
                "panel": "new"
            },
            "problemMatcher": [
                "$gcc"
            ]
        }
    ],
    "version": "2.0.0"
}
And the second is to create a Task to run gdb after running make. This allows you to set a breakpoint, save, hit F5 and be dropped into a debugging session automatically.
{
    "version": "0.2.0",
    "configurations": [
        {
            "name": "gcc build and debug active file",
            "type": "cppdbg",
            "request": "launch",
            "program": "${workspaceRoot}/hashcat",
            "args": ["-a", "3", "-m", "23911", "test.hash", "dictionary", "--force"],
            "stopAtEntry": false,
            "cwd": "${workspaceFolder}",
            "environment": [],
            "externalConsole": false,
            "MIMode": "gdb",
            "setupCommands": [
                {
                    "description": "Enable pretty-printing for gdb",
                    "text": "-enable-pretty-printing",
                    "ignoreFailures": true
                }
            ],
            "preLaunchTask": "Build Debug",
            "miDebuggerPath": "/usr/bin/gdb"
        }
    ]
}
Another handy tip while debugging is to add a variable to Watch. By default VSCode shows decimal values but if you want the hex output, append ,x to the variable. If you want to see 64 bytes at some pointer address, append *(char(*)[64]) to the variable name and combine with appending ,x to see the hex values at a pointer location.
Use the Source
Layout
If you’re looking at the hashcat working folder, there are a few folders we’re interested in:
OpenCL/ 		<-- OpenCl kernels for crypto primitives
src/modules/ 		<-- Hashcat modules
tools/test_modules/ 	<-- Perl test modules
A key point to know is that OpenCL is its own language based on C. The OpenCL kernels (.cl files) contains the code that actually does the heavy lifting of computing hashes. In OpenCL nomenclature, a kernel is simply code run on an OpenCL device (your video card). In this case we’re going to use an existing kernel which supports PBKDF2-HMAC-SHA256 and that is the m10900-pure kernel. The magic happening there might come from the specs defined in the RFC but that’s beyond the scope of this article.
Searching the repo for references to 10900 there are four hashcat modules using this kernel. One is for Python’s hashlib (20300), Django, IOS, and a generic function. All of these are good references but I’ll use the 20300 hashlib module as a template. Doing some additional digging, the Atlassian module (12001) has a very similar hash but is using a different kernel. We can borrow some code from there too.
Hashcat Modules
If you look at any module in src/modules you see they all start in the same way. At this point I’ll walk through the module I ended up writing.
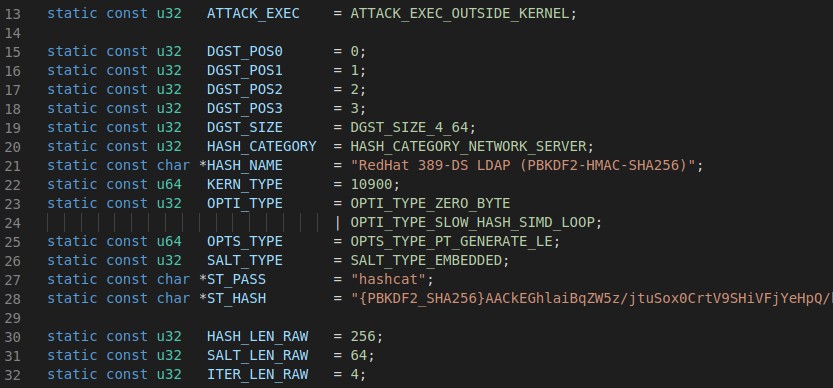
These initial declarations tell hashcat about the module, its name, the OpenCL kernel it should use, optimization types to use, and a password and hash to be used in a kernel self test run before cracking begins. The only change of significance I made other than the name was to the DGST_SIZE. 389-DS has a 256 byte key so I changed that to DGST_SIZE_4_64 as defined in types.h.
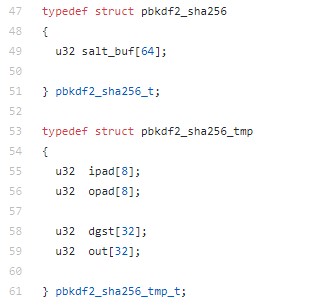
Further down are some structs to hold salt and hmac information which is handed to the kernel. No need for making changes here since we’re using the same primitives defined in the 10900 kernel and 20300 module.
The next few functions (module_esalt_size, module_tmp_size, module_pw_max) won’t need changed in this case.
Next comes the functions module_hash_decode and module_hash_encode. This is where you define how Hashcat should parse out salts, iterations, and keys/digests from a hash and how to rebuild the hash.
And finally at the bottom is a module_init section which I made no changes to as the defaults were appropriate.
Decoding
The module_hash_decode function is run after hashcat reads a hash value.
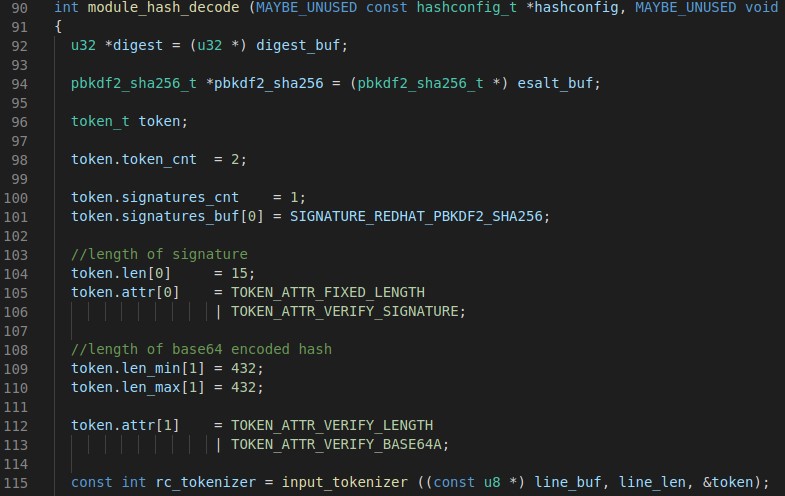
Tokenizing
A builtin token struct allows for easy parsing of a hash. For example, the hash algorithm$iterations$salt$digest would have the salt available in token.buf[2]. The token struct also allows for easy validation of attributes with for example token.attr[1] = TOKEN_ATTR_VERIFY_BASE64A to validate the second piece of the hash was indeed Base64 encoded.
In the case of 389-DS, hashes contain a 15 character signature followed by 432 characters of base64. As can be seen in the above picture, those lengths are specified and hashcat automatically does the verification upon loading the hashes.
{PBKDF2_SHA256}AACkEGhlaiBqZW5z/jtuSox0CrtV9S...QRevNx
Once the major pieces of the hash are obtained, input_tokenizer verifies things are okay.
Buffering the Hash
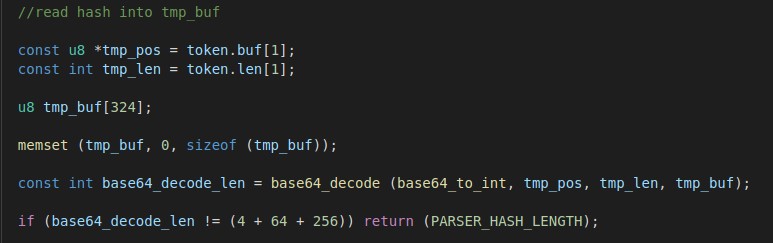
At this point our tasks is to extract the various elements from the hash. The second token buffer (in token.buf[1]) contains the hash without the signature. We create a new buffer to hold our base64 decoded bytes and decode them followed by a sanity check. The 389-DS hash should contain 4 bytes for iterations plus 64 bytes of salt plus 256 bytes of key material.
With tmp_buf containing our decoded hash, we can now parse out the iterations, salt, and digest.
Identifying the Iterations
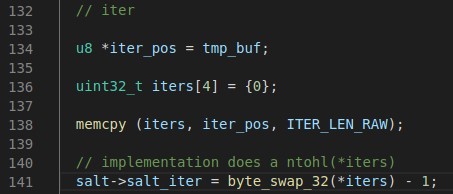
The first four bytes contain the iteration count so we set our iterator at the beginning of the buffer, create a new variable to hold the iterations and memcpy the data over. The 389-DS implementation does a ntohl on the iteration count so we do that here with Hashcat’s byte_swap_32 function. One thing that threw me for a loop was the requirement to subtract one from the count. My C skills are non-existant so this may be a well known thing but it tripped me up until I realized a number of other modules were doing the same.
Selecting the Salt
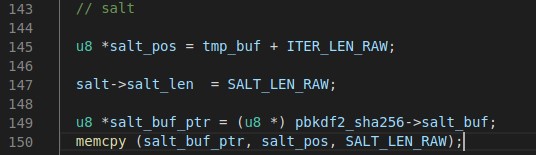
Here we copy the next 64 bytes of salt into both the salt->salt_buf and pbkdf2_sha256->salt_buf structures.
Catching the Key
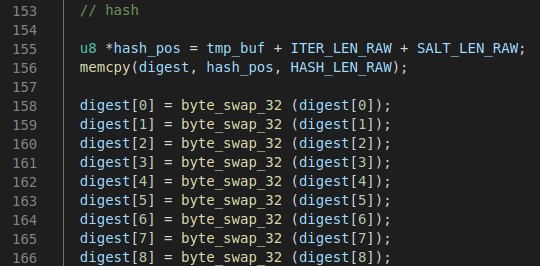
And finally we copy the next 256 key bytes into digest. As this is written to memory in little endian format, but we want to preserve the order of the bytes, each 4 bytes of uint32 needs to account for that with the byte_swap_32 hashcat function. Since there are 256 bytes of keys we do this 256/4 = 64 times.
Encoding
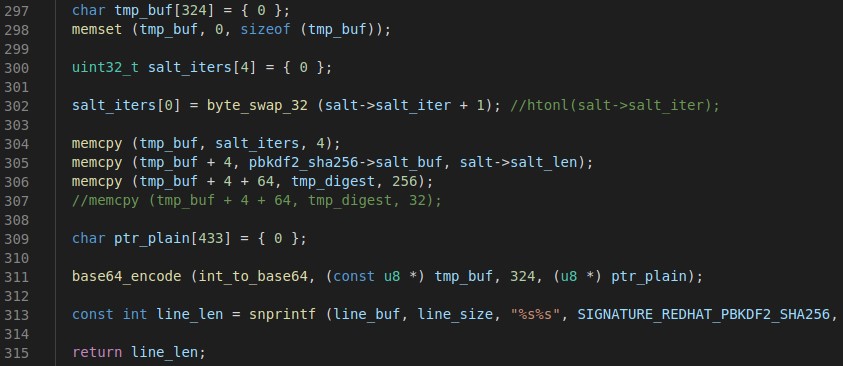
After the kernel computes a digest and finds a matching digest from a guessed password, hashcat passes the information to module_hash_encode which encodes a new hash which should match the original.
We fix the digest endianness by byte swapping again and do the same for the iteration count to account for the way 389-DS stores the value in the hash. Finally, we create a new buffer, copy these values into it (iteration|salt|digest) and base64 the bytes.
The signature is prepended to the resulting base64 output and snprintf’d.
Testing
Assuming all that goes well, hashcat has some test modules which are written in Perl and can be found in tools/test_modules/. These modules are independent from the src/modules. You may first want to install Perl and Python depedencies with install_modules.sh.
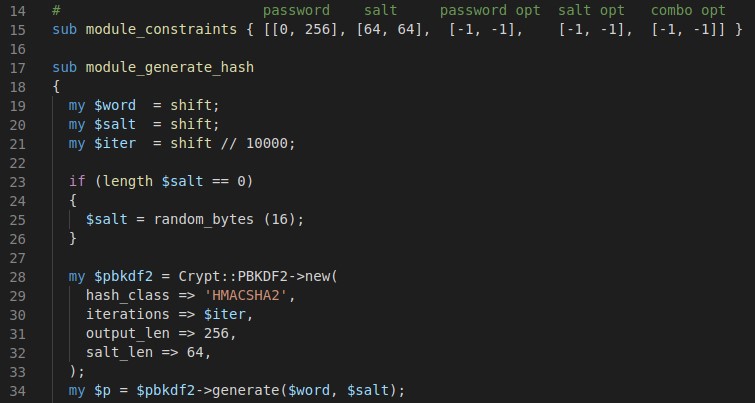
The readme is a good place to start. In essence there are three functions in a test module: a constraints function, a generate hash module, and a verify hash module each of which is fairly self explanatory.
module_verify_hash takes in a line hash:password and you define how to extract the necessary values, passing the appropriate data to module_generate_hash. Generate takes those values, creates a new hash from them, and returns it.
There are a few test scripts in the tools directory including test.pl which among other things will use the test module to create password hashes, and check that passwords create the appropriate hashes.
Test.sh runs through numerous testing types and should be run to ensure your module is running as expected.
./tools/test.sh -m 42000 -a all -t all
Note that running a benchmark won’t invoke the OpenCL kernel, so you’ll need to specify your module and a password to crack. If it fails immediately with a ATTENTION! OpenCL kernel self-test failed error, your decode module is probably passing incorrect values to the OpenCL kernel. When Hashcat starts it will initially try to crack the example hash and password specified in ST_HASH and ST_PASS, so those must be valid as well.
And after all that
When I initially wrote a multi threaded python script to guess passwords I was getting < 100 guesses per second.
C:\Users\thesubtlety\hashcat-master>.\hashcat.exe -a 0 -m 23911 test.hashes ..\rockyou.txt --username
hashcat (v5.1.0) starting...
Session..........: hashcat
Status...........: Running
Hash.Name........: RedHat 389-DS LDAP (PBKDF2-HMAC-SHA256)
Hash.Target......: test.hashes
Time.Started.....: Sat Feb 29 18:25:56 2020 (1 min, 10 secs)
Time.Estimated...: Mon Mar 02 02:52:06 2020 (1 day, 8 hours)
Guess.Base.......: File (..\rockyou.txt)
Guess.Queue......: 1/1 (100.00%)
Speed.#1.........:    88451 H/s (8.72ms) @ Accel:4 Loops:128 Thr:1024 Vec:1
Recovered........: 0/720 (0.00%) Digests, 0/720 (0.00%) Salts
Progress.........: 6144000/10328357520 (0.06%)
Rejected.........: 0/6144000 (0.00%)
Restore.Point....: 0/14344941 (0.00%)
Restore.Sub.#1...: Salt:100 Amplifier:0-1 Iteration:4224-4352
Candidates.#1....: Passw0rd!23 -> 030403
Hardware.Mon.#1..: Temp: 73c Fan: 49% Util: 99% Core:1898MHz Mem:3802MHz Bus:16

{PBKDF2_SHA256}AACkEGhlaiBqZW5z/jtuSox0CrtV9SHiVFjYeHpQ/ki2kwDrQeSqiiTn8LOmpPCw3r6TK/JDfl+ZAXRoc3VidGxldHllIXuxBDl6ItQOMupkRn+hzi/LEdr62a7B9sNOo8BPL9Z2nOi/m9AI+nAd/qwpLD1fbeDgs2DdpCZ4QfljuCLRBdURZV3HcXDUjD7PZ1CQcIOv9VbFlbu0IBmiU7ccMyb/qoxi+rPMqE4U8f6hL0TQjTjlOzU9MpPYS+WfztpYy7lEN6QghhOz0xe+0y2rDoK+yCS4PykkNS4FFc+xeiT6SNy3r7m+0teyaQKOExLrjogWkj+t+e4bMpHNx/FL3jkjCsuZnhq/t8eshG9DKmeD9b/QMkqT8dxe0jmr0s4+GnmHpMQMAxYW3pg70TluiDp3kJrDr1/d8OQerkQRevNx:hashcat
And now we’re a few orders of magnitude beyond that! Thanks for reading!